Friday 31 December 2010

Best of 2010

Wishing all my friends and readers a very Happy and Prosperous NEW YEAR. I finally managed to come here and do a last post of 2010 :) This year has been like a roller coaster ride for me...I took too many breaks from my blogging and could post only few recipes compared to last year. But I am happy to say that I learned and explored many new and different cuisines this year. And I promise to back next year with many more recipes and try my best to be active every month in posting on my blog and visiting other food blogs. For now...here are the best recipes and most liked recipes of 2010 on my blog.

1. Box of Chocolate Cake


2. Classic Carrot Cake


3. Black Forest Cake
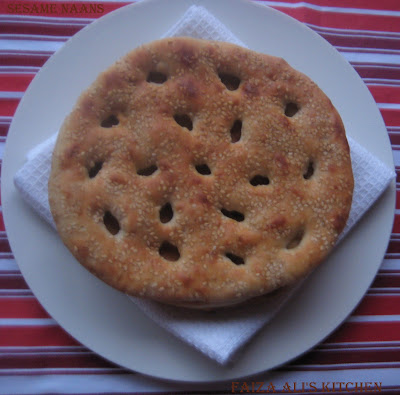


4. Sesame Naans


5. Portuguese custard tarts


And here are few of my personal favourites...


1.Shakshouka


2 Tiramisu cake

3.Baked blueberry cheesecake


4. Bread Chaat

5. Achari gosht

Thursday 25 November 2010

Cherry and Blueberry Clafoutis


Have you ever noticed the difference in taste when you buy fruits from the supermarket and the ones that you buy from the Local farmer's market. If not.. than let me tell you that the local farmer's markets always sell fresh fruits grown locally .and organically and thus the taste is always much much better than the store bought fruits. Though they have short shelf life, I love the fresh taste of their fruits.

So, for me farmer's market is my favourite place for buying our fruits and veggies. We always make it a point to go there once in a week to buy fresh produce. And during one of my visits to the local farmer's market, I grabbed these juicy and fresh cherries.They were so sweet and tasty and not to forget about their freshness. And I had bought too many cherries that week, so I decided to make Clafoutis with them. Actually this post was looong due (more than 2 months) in summer ..but as I was not very active in my blog, I am posting this now.Anyways, its better now than never..right?

Clafoutis or clafouti pronounced kla-foo-TEE is a very famous baked French dessert made commonly with fresh cherries layered in a dish and covered by a thin batter. And served with generously dusted icing sugar.It is traditional to use the cherries with their pits as it is believed that the pits release a nice aroma to this delicious dessert.And here in this recipe, I have used the cherries with their pits. But, I know that many people out there would not like biting into the pit in their dessert. If you are among those, you can pit the cherries before baking.

CHERRY AND BLUEBERRY CLAFOUTIS

Ingredients:
400 grams of cherries
100 grams of Blueberries
1/2 cup all purpose flour
2 large eggs-lightly beaten
4-5 tbsp fine sugar
250 ml milk
50 grams unsalted butter-melted
1/2 tsp of vanilla extract and
Icing sugar for dusting

Method:
Pre-heat the oven to 180 C/350 F. Butter a shallow oven proof dish . Place the cherries and berries in the dish. In a bowl, mix the flour, milk, sugar, eggs , melted butter and vanilla extract until smooth and creamy. pour over the fruits and bake in the pre heated oven for 30-35 minutes or until a skewer inserted in the middle comes out clean. When warm, dust with icing sugar and serve warm with a scoop of vanilla ice cream or whipped cream or crème frâiche.

Notes:
Don't over beat the mixture. Just mix very lightly until well blended and smooth.
Like I said earlier, I have used the cherries with the pits. But one can pit them, before using for clafaoutis with a cherry pitter.
I had blueberries, so I just added them to this clafoutis. But you can entirely use cherries or with any other favourite fruit of yours.

This yummy French dessert is off to DK's event AWED hosted this month by Priya of Priya's easy N tasty Recipes and AWED is celebrating French cusine this month.

Friday 19 November 2010

Bhindi do Pyaza /Stir-fried Okra

As I had written in this post that,how the other I was having a good time cooking all vegetarian food when my hubby was not in town. And also was soo happy to cook food specially for myself, which I never bother to do otherwise. So...when I cooked Tawa Pulao I wanted a vegetarian side dish instead of the usual non-veg ones. And I decided on this Bhindi do Pyaza , which I had learned from one of my friend. And loved it to the core.

Bhindi known as 'Okra' in English or 'Ladies finger' as we had always known it in India has always been my fav fav vegetable of all. I just love any and every dish with Okra. And whenever I go to an Indian store for grocery, I never fail to pick some fresh Okras (ladies finger). My favourite sabzi (side-dish) with roti has always been Bhindi. And this easy Stir-fried dish goes well with roti or rice.

This dish is called 'Do Pyaza' because of the double quantity of onions used than that found in any other style of preparation. there are many variations to this famous dish.Some use tomatoes and others even use yogurt in its preparation. But I always love to cook this with just lots of onions and some simple spices. But let me assure you that it still tastes awesome and very tasty.

BHINDI DO PYAZA

Ingredients:

400-500 grams of fresh Okra /ladies finger,
3 onion- thinly sliced,
1-2 green chillies,
1/2 tsp cumin seeds,
1/2 tsp kalonji (nigella) seeds,
1/4 tsp turmeric powder,
1/2 tsp chilli power(optional),
juice of 1/2 lemon,
2 tbsp of cooking oil and
salt to taste.

Method:
Wash the okra and dry it thoroughly by wiping it with a kitchen towel. Cut them vertically into slices. Heat the oil in a wok/ kadai and add the the sliced okra to it and stir fry for few minuted until, they are half cooked. remove them from the oil and keep aside. In the same oil add the cumin seeds and nigella see
ds. When they splutter, add the finely sliced onions and slit green chillies and cook, till the onion turns very light brown in colour. Now add turmeric powder, chilli powder(if using) and salt to taste, immediately add the stir fried okras, lemon juice to the wok and cook for further 5-8 minutes or until the okra is cooked. Serve hot with Roti or as a side dish with rice and curry.

Notes:
The first step of stir frying the Okras, is to avoid them from getting slimy and mushy, but one can skip that step completely but cook it for more time after adding the Okras. just make sure you don't cover the wok and cook for a long time, because it will end up as a slimy okra dish.

Also make sure that there is no moisture on the Bhindi/ Okra before you slice them. Even little moisture can make them slimy.


Monday 15 November 2010

Tomato Souffle

Happy Eid-ul Adha to all my friends !! And Phew !!!After much procrastination, I finally managed to write this post, which was for sweetpunch-November as I had mentioned in my previous post.... I had made 2 dishes for this month and I was supposed to post this last week..but never got time to do so. But I finally managed to post it today :)

A souffle is a light and fluffy baked cake made with egg yolks and beaten egg whites combined with other ingredients and served as a savoury main dish or sweetened as a dessert. But I had always seen and tasted souffle as a dessert. So, When I saw this recipe from Maria's Menu, I really wanted to give it a try and I must say it was a very tasty savoury Souffle. And I would definitely make this again and again. so, without further ado, goes the recipe for this tasty Tomato Souffle.

TOMATO SOUFFLE
(Recipe source : Australian Woman's Weekly via Maria's Menu)

Ingredients:


1/2 cup bread crumbs – firmly packed
45 gm Butter
1 medium Onion –finely chopped
2 tbsp Plain flour (maida)
1 cup milk
3 tbsp tomato paste
1 tbsp fresh Basil –finely chopped (optional)
3 Eggs –separated
1/4 tsp pepper powder
Grated Cheese (mozzarella)– a handful

Method:

Grease 4 souffle dishes (1/2 cup capacity), sprinkle with breadcrumbs. Melt butter in small saucepan, add finely chopped onion. Stir over low heat for 2 mins ( or MW on HIGH for about 2 mins). Cook until onion is soft, it doesn’t have to become brown.
Stir in flour and stir over medium heat for a minute. (or MW on HIGH for a min). Remove from heat, gradually stir in milk, bring back to heat and stir over high heat until mixture boils & thickens & reaches a thick sauce like consistency. (or MW on HIGH for about 3 mins).

Transfer to large bowl, stir in tomato paste & basil leaves. Cover the dish & let it stand for 5 mins. Beat egg whites in a small bowl until soft peaks from. Add egg yolks to the onion & milk mixture & mix well. Fold the egg whites into the mixture in 2 batches. Pour the mixture evenly into the prepared dishes. Sprinkle the grated cheese on top. Bake in the preheated oven at 350 F/175C for 20- 25 mins or until lightly browned. Serve hot with garlic bread or soup.

Healthier version:

Use brown bread crumbs & low fat milk. Also use yolks of only 2 eggs & white of 3 eggs. Use only lesser qty of butter, I used only 20 grams of butter.

Notes:

The above qty serves 2 adults (main course) served with garlic bread or soup. Souffles can be baked in any oven proof dish or for individual serving, use ramekins. I baked them in small ramekins and some in an oval oven-proof dish.

The Souffle looks very puffed up wen comes out of the oven and it falls rather very quickly.So, its better to serve it hot ..just right out of the oven with some warm soup.

Verdict:

My Family just loved this to the core...specially my kid loved this. coz from past few weeks(after starting school) he has stopped eating spicy food and is always asking me to cook something less spicier than our usual India food. He was soo happy after eating this that I heard him telling his dad that night '' Dad.. I want to grow as tall as you (that would be 6.3'') so that I can beat some eggs and make tomato foushlle( for Souffle) with mommy in the kitchen :)

Monday 8 November 2010

Instant Eggless Chocolate Mousse

Back with yet another punch, seems like just few days back I posted Molten Lava Cake and here comes another choclatey post - an instant and eggless Chocolate Mousse.Yes !! Instant Chocolate Mousse... coz it tastes only 1 hour to set unlike the version with eggs , whick takes atleast 7-8 hours to set.

This month we were given 3 recipes to choose from..One of them was this easy peasy Eggless mousse and there other options were Chocolate mousse(with Eggs) and a Savoury Tomato Souffle. I chose to make this recipe and also tried my hands at Tomato Souffle (wil post it next).

Now this recipe need only 5 ingredients and the main ingredient that helps this mousse set is Marshmallows. As marshmallows contain gelatin, I had a hard time searching for Halal Marshmallows...but finally found them in an asian store and was soo happy to try this eggless version of mousse which I had bookmarked loooong back from Nigella Lawson's website.

EGGLESS INSTANT CHOCOLATE MOUSSE
Recipe Souce :Nigella Lawson

Ingredients:

150 gms Mini marshamallows (you can use regular marshmallows too)
50 gms Butter- softened
250 gms Chocolate( preferably dark Chocolate)-chopped into small pieces
60 ml Hot water
284 ml Cream and
1 tsp Vanilla extract

Method:

In a heavy-bottom saucepan, melt the marshmallows,butter,chocolate and water together, stirring every now and then, till evrything melts to form a smooth sauce. Let the Chocolate cool while you are whipping the cream. Meanwhile, whip the cream with vanilla until thick (firm peaks).

Fold the whipped cream into the cooling chocolate mixture until you have a smooth mixture. Pour or pipe into individual ramekins or glasses and let it set in the fridge for about 1 hour. Serve with whipped cream and or with strawberry / raspberry. Or just sprinkle some grated white chocolate :)


Verdict:

A smooth and divine Mousse which you will definitely fall in love with. We just loved indulging ourselves in this dessert . And this is a very easy and eye-catching dessert for any party. So do try it and see for yourselves :)


Friday 5 November 2010

Tawa Pulao

First of all A very happy Diwali to all the readers !! Coming to today's recipe...its a very easy and yummy rice , which can be ready in few mins if you have cooked rice or left-over rice at home..There days when I crave for pure vegetarian food for my lunch..and thats possible only when hubby dear is out of town, because even if I cook vegetarian main dish, there has to be atleast 1 non-veg side dish with it for him. So, on one such occasion, when my better half was out of town for few days, I decided to make Tawa pulao which I had bookmarked from DK's Chef In You. Though I had tried this recipe from her blog almost 2 months back, never got a chance to post it here (as you all know how busy or rather lazy I have been past 2-3 months)

And fortunately when Priya of Priya's easy n Tasty Recipes announced that she has chosen Chef In You as the blog for this months Tried and Tasted-an event started by Zlamuksha and taken over now by Lakshmi of Kitchen Chronicles , it gave a a perfect opportunity to post this recipe.

I must admit that this pulao was soo yummy and flavourful that I have sooo fallen in love with its taste and have cooked this many times after that day. I sincerely thank DK for sharing with us this tasty recipe.

I have followed her recipe except for some changes here and there..like I added some own spices because I didn't have Pav Bhaji masala at home and instead of using both butter and vegetable oil, I
used only vegetable oil. For original recipe hop over to her lovely space here .

TAWA PULAO

Ingredients:
2-1/2 cups of cooked rice
1 1/2 tbsp of vegetable oil,
1 large onion-chopped,
2-3 tomatoes- finely chopped,
1/2 red bell pepper(capsicum)-chopped,
1/2 green bell pepper- finely chopped,
1/2 cup frozen green peas,
2-3 green chillies,
1 tsp ginger paste,
1 tsp garlic paste,
1 tsp cumin seeds,
1/2 tsp fennel seeds,
1/4 tsp turmeric powder,
1/4 tsp garam masala powder,
1/4 tsp amchoor(dry mango) powder,
1/4 tsp of red chilli powder,
1/4 tsp black pepper powder,
Cilantro for garnishing and
Salt to taste


Method:

Heat the oil in pan or kadai and add cumin seed and fennel seed. When they splutter, add the chopped onions, salt and gree
n chillies. Saute for few minutes and add ginger- garlic paste and saute for 5 more minutes . Now add the chopped tomatoes and the capsicum and cook till all the tomatoes are cooked and the oil separates from the pan. Add all the dry spices and stir well and lastly add the green peas, cooked rice and chopped cilantro. Toss it to coat the rice completely with the spices and cook for further 2-3 minutes on low flame. Serve hot with raita or any vegetarian side dish. I had made Bhindi Do pyaza (recipe to coom soon).

Saturday 30 October 2010

Paneer Jalfrezi

If there is anything that can replace the chicken thats Paneer (Indian cottage cheese) for me. I fell in love with this cheese just 1-2 years ago and it has never failed to make me happy since then :) These days I just love to try anything that has paneer in it. The other day I spotted this recipe in one of Sanjeev kapoor's book and loved how simple it sounded..and trust me this recipe was more simple than I had thought. And the verdict was a very very tasty paneer dish. Till now Chilli paneer and Paneer Tikka was my favourite ...but now this tops them all.

Paneer Jalfrezi -a very appealing vegetarian dish. With all the colourful veggies in it.... this paneer dish is sure an eye catching food and guaranteed to tickle your tastebuds. like i said earlier its very easy to cook and tastes awesome.
In this recipe, I have used store bought Paneer. But if you want to make Paneer(Indian cheese) from scratch you see here .


PANEER JALFREZI
Recipe source- Sanjeev kapoor's book 'Recipes for Indian Kitchen'

Ingredients:
250-300 grams of Paneer,
2 onions-thickly sliced,
2 tomatoes-de seeded,
2 Green bell peppers(Capsicum),
1-2 green chillies-chopped,
2''piece of ginger-julienned,
3-4 whole red chillies,
1 tsp of cumin seeds,
1 tsp of red chilli powder,
a pinch of turmeric powder,
1/2 tsp of garam masala powder,
a few sprigs of coriander leaves(optional),
1 1/2 tbsp of vinegar,
2 tbsp of oil and
salt to taste.


Method:

Cut the paneer into 2 inch long pieces. De-seed and cut the Tomatoes and Bell peppers into 2 inch long slices.
Heat oil in a kadai/ wok and add the cumin seeds and halved whole red chillies and saute for a minute. Now add the julienned ginger and onions and saute for few minutes.Make sure you don't saute it for long, which will turn the onions very soft. Add turmeric powder, red chilli powder and stir well. Add the bell peppers(capsicum) and cook for few minutes(2-3 minutes). Now add the Paneer and toss well-to coat it completely with the spices. Add vinegar and salt and cook for 5 minutes.Finally add the tomato slices , garam masala powder and finely chopped coriander leaves and toss well. Serve hot garnished with some julienned ginger/ chopped coriander leaves.


Note:
The tomatoes should be added lastly.Adding it earlier will over cook them and make them soft. So..add them in the last.
Cooking this in a non-stick wok needs very less oil. I used less than 2 tbsp. One can use more (3 tbsp) if needed.

Thursday 7 October 2010

Molten Lava Cake

FINALLY !! Finally, I managed to come back to blogging after exactly 3 months of break. Its been exactly 3 months, since I last posted on my blog. And my last post was something Chocolatey and here I am back with yet another irresistible choccolate cake recipe. This cake was baked for Sweetpunch-October, chosen by Divya Kudua.

The cake was sooo yummy with the gooey chocolate sauce flowing out from the soft chocolate cake. And I must say this is the easiest cake I have ever made, preparing the bater takes just few mintes and baking this delicious cake takes only 10 -11 minutes. And Voila !! your Molten Lava cake is ready in less than 30 minutes. And make sure you eat these, when they are still hot or atleast warm to enjoy the hot chcolate sauce oozing from the cake like lava :)


MOLTEN LAVA CAKE
-serves 4
Recipe source - showmethecurry.com

Ingredients:
4 oz (113g) Semi-Sweet Baking Chocolate,
4 oz (113g) Butter,
2 Eggs,
1/3 cup (75 g) Sugar,
1/4 cup (40g) All purpose Flour,
Butter – for greasing ramekins


Method:
1. In a double boiler, melt chocolate.
2. In a medium mixing bowl, beat Eggs and Sugar until light and fluffy.
3. Once chocolate is melted, remove pan from heat and add in butter. Mix until the butter melts fully.
4. Add chocolate/butter mixture into the eggs, add all-purpose flour and mix until well incorporated.
5. Butter bottom and sides of ramekins (small glass/porcelain bowls) and pour in mixture about 3/4 way full.
6. Place ramekins on a baking tray and bake at 350 degrees Fahrenheit (180 C) for 10 – 15 minutes. Shorter for gooey (molten) inside, longer for stiff inside.
7. Serve hot with vanilla ice cream or with a dusting of powdered sugar.

Notes:

The above recipe makes 4 medium sized ramekins.The cake is done, when the sides of the cake looks cooked, but the centre is still wobbly. Baking it longer(cooking completely) will make the inside stiff. So, keep a close eye to make sure you don't over-cook them.

Wednesday 7 July 2010

Devil's Food Cupcakes with Vanilla Cream filling

The second recipe from' A Sweet Punch' was these Cupcakes. And these are the first ever cupcakes I have baked...the only time I had used my cupcake pan was to bake these Portuguese Custard tarts. Never had I thought that I would be using it to make cupcakes , but here I am with the cupcakes and I thank Divya of Easycooking for this months Challenge through which I had a very new baking experience.

I enjoyed making these cuppie cakes and when I bake this next time, the only change I want to make is to not use the wrappers for them, coz I think they will look more cute without the wrappers as these are filled cupcakes. And I didn't use the Chocolate butter cream frosting. Instead I just used my family favourite Nutella as frosting. The recipe given below yields 24 cupcakes and if you want you can halve the recipe for 12 cupcakes...but As there were some lil guests at my House I knew they would all be gone in a day. So, made 24 of these and the verdict was that they all vanished the same day coz they were so moist and yummy.


DEVIL'S FOOD CUPCAKES WITH VANILLA CREAM FILLING
Recipe source - Baking bites

Ingredients
1/2 cup butter- room temperature
2 cups sugar
3 large eggs
3/4 cup sour cream (low fat or full) -can be substituted with yogurt or cream mixed with a tsp of yogurt
1 tsp vanilla extract
2 cups all purpose flour
2 tsp baking soda
1/2 tsp salt
1/4 cup cocoa powder
2-oz dark chocolate
1 cup water, boiling


Method :
Preheat the oven to 350F and lightly grease two 12-cup muffin tins.
In a large bowl, cream together butter and sugar until light.Beat in eggs one at a time, followed by sour cream and vanilla extract.
In a small bowl, whisk together flour, baking soda and salt.
Add half of flour mixture to the butter mixture, followed by the sour cream and vanilla extract, followed by the addition of the rest of the flour mix.
Stir well between each addition and mix until no streaks of flour remain.Stir the cocoa powder and the dark chocolate into the boiling water in a large measuring cup.
Pour chocolate water into the rest of the batter and stir until uniform.Evenly distribute batter into prepared baking cups. Bake for 13-15 minutes, until a tester comes out clean and the cakes spring back when lightly pressed. (It’s fine if you can’t fit both trays into the oven at the same time, just wait until one batch finishes before putting in the second pan)
Turn cupcakes out onto a wire rack to cool completely before frosting and filling.


Vanilla Cream Filling
3 tbsp all purpose flour
1/2 cup milk (low fat is fine)
1/2 cup butter (or trans fat-free shortening)
1/2 cup granulated sugar
1/2 scraped vanilla bean or 1 tsp vanilla extract

Method:
Whisk together the flour and milk and cook in a small saucepan over medium heat until thick. This will only take a few minutes.
Stir continuously to prevent the mixture from clumping and do not bring all the way to a boil.
When thickened (consistency will be that of a thin pudding or custard), strain with a mesh strainer into a small bowl, cover with plastic wrap and let cool completely to room temperature.
When the milk mixture is cool, cream the butter (or shortening) and sugar together in a medium bowl until light. Add in the milk/flour mixture and the scraped vanilla bean seeds (or vanilla extract) and beat at high speed with an electric mixer for 7 minutes, until light and fluffy.
Scrape into a pastry bag fitted with a plain tip, or a large zip-lock bag with the corner cut off, and set aside until ready to fill your cupcakes.

Chocolate Buttercream Frosting
1/2 cup butter, room temperature
1/2 cup unsweetened cocoa powder
2-3 cups powdered sugar
1/4 cup milk1 tsp vanilla extract

Method:
Combine all ingredients in a large bowl and beat, with an electric mixer, until frosting is creamy, 3-5 minutes. Add additional powdered sugar as needed to achieve a thick, but not stiff, frosting that is easy to spread. Add additional milk, if necessary, to thin the frosting if it gets too thick.


Assembly
(A photo how-to of the assembly method can be found here.) Take a cooled cupcake and, using a small pairing knife, cut a cone of cake (1-inch across by 1-inch deep) out of the top. Trim off the pointy end of the cone, leaving a flat circle of cake. Set aside and repeat this process for all the cupcakes.Take the cream filling and squeeze a tablespoon or so into each cupcake cavity, filling the hole up to the top with filling. Top off with a flat circle of cake to plug the hole and keep the filling in place.
Using a butter knife or a small offset spatula, frost each cupcake with a layer of chocolate butter cream frosting. Place a dollop of icing in the center of the cupcake (on top of the cut out circle of cake) and spread from the center to the sides of the cupcake.If you have leftover filling, transfer it to a fresh Ziploc bag and cut a very small opening in one corner. Pipe a swirly line down the center of each cupcake, like the cupcakes in the pic here .
Store in an airtight container until ready to serve.


Note:
The frosting can be skipped completely and can be served with with some sugar dusted on the top. These soft and most cupcakes taste yummy, even without any frosting.

Saturday 26 June 2010

Tomato and Basil Bruschetta

The weather here in UK is soo sunny and bright these days and I am loving this lovely weather and enjoying it to the fullest and thus not getting much time to post regularly and also for blog hopping.

And today's post was in drafts from more than 2 months ago..finally it got some attention and light today :)

Bruschetta pronounced as
brusˈketta is an easy an eye-catching appetizer from the country of Italy. There are many variations for the toppings but, I make it this way-which is easy and ready in few minutes, and also need very few ingredients.

TOMATO AND BASIL BRUSCHETTA

Ingredients:
1 loaf Ciabatta bread or any other hard crust bread,
2-3 tbsp of extra virgin olive oil,
2-3 cloves of garlic,
5-6 ripe plum tomatoes,
few basil leaves ,
1/4 tsp pepper powder andsalt to taste.

Method:
De-seed and chop the tomatoes into small cube and chop the basil leaves finely. In a bowl, mix the chopped tomatoes and basil leaves with salt and pepper powder and also add 1/2 tbsp of olive oil to it. Mix well and keep aside.

Slice the bread into 1"inch in thickness. Rub the slices with garlic clove ad drizzle some olive oil on the slices and toast them in an oven or over a griddle(tawa) until they turn crispy and light brown in colour. Spoon the tomato and basil mixture on the toasted slices and serve as an appetizer or a snack.


Variations: If you like your tomato topping to be soft and juicy, add some boiling water to the chopped tomatoes and mash slightly.
And if you want to make it more appealing, you can bake the slices after adding the topping and some grated cheese on top.

Note:
Traditionally Ciabatta bread loaf is used for Bruschetta, but one can use any Italian bread or any bread that has a hard crust.
Make sure the tomatoes used are ripe and red in colour,


Monday 21 June 2010

Baked Blueberry Cheesecake- with blueberry sauce

Creamy , yummy and gorgeous looking dessert- Yes !! I am talking about cheesecake. I am sure those have tasted cheesecake can never say 'No' to this tempting dessert. I fell in love with this dessert during my stay in New York State and let me tell you NY cheesecakes are very famous all around the globe. And if you are living in US you should definitely try cheesecakes from 'The Cheesecake Factory' atleast once.

My love for cheesecakes urged me to learn making this dessert at home..The first cheesecake I made was Strawberry cheesecake which I have earlier posted in my blog here. And this time, I baked a Blueberry cheesecake with home made Blueberry sauce. And I was so happy with the results, I just loved the gorgeous colour of the blueberry sauce on it and I was so happy that it was baked perfectly and didn't crack. And I am definitely going to bake this again and again.

BLUEBERRY CHEESECAKE

Ingredients:

For the base:
1 cup digestive biscuits-crumbs,
3 tbsp of melted butter,
1/4 tsp of cinnamon powder and
1/2 cup of sugar.
For the filling :
16 oz /approx 500 grams of cream cheese,4 large eggs,
16 oz sour cream,
1 1/4 cup sugar,
3 tbsp all purpose flour,
1 tsp vanilla extract and
1 tsp lemon zest.
For the sauce:
2-3 cups fresh Blueberries,1/2 cup of sugar,
1 tbsp of cornstarch and
juice of half lemon.
Method: Preheat the oven to 325° F / 162° C. In a bowl, mix all the ingredients for the crust and And press this mixture firmly into a round spring form baking pan. Press in very firmly using the back of a ladle or with a measuring cu(with flat surface). When, the crust is firmly pressed, refrigerate the pan till the filling is ready.

To make the filling- Beat the cream cheese in a bowl with a hand held mixer on medium speed until fluffy.Add the sugar and beat again for 1 minute. Add the eggs 1 at a time and beat on low speed after each addition . Add the sour cream, flour, vanilla essence and the zest and beat on low speed just till all the ingredients are well combined. Pour this mixture into the chilled crust and bake in the middle rack of the oven for 45-60 minutes or until firm, but little wobbly in the center. Remove from the oven and let it cool on a wire rack . Refrigerate for ateast 7-8 hours or overnight and just before serving top it with blueberry sauce or store bought blueberry pie filling.

For the sauce:
Combine all the ingredients listed above in a non stick saucepan and cook over a medium heat until the sugar is melted, the blueberries breaks and till it reaches the consistency of a sauce. Cool in the refrigerator until ready to use.


Notes:

Special care should be taken, to prevent the cheesecake from cracking. And the main reasons for the cheesecake cracks are over beating the ingredients or over baking. So, always make sure not to over-bake the cake.
If you like the the crust even on the sides, just double the quantity given above for the crust and press the mixture firmly and evenly on the sides.

LinkWithin

Related Posts with Thumbnails